Project Year 3 - 2000
For winter of 99 I scheduled a rebuild of the lower end to attempt to solve a water leak in the gear case. Each time I changed the lower end gear oil it had been milky with water. Finding the seals and gaskets for a 67 motor was a real challenge. Lacking professional tools I opted to not replace the top drive shaft seals. This proved later to be a mistake as the gear case still takes on a little water between oil changes. Before reassembling I painted the lower end and the rear cover of the motor with Tempo OEM Motor paint.
Spring of 2000 brought thoughts of painting the bottom and how to do it. The original bottom gelcoat had been painted over more than once and the paint color had faded and had lots of scratches, a few of which I added that first season learning how to dock. I assumed the original gelcoat had been white since some could be seen through scratches in the layers of paint. Later sanding proved this to be correct. The previous fall when I hauled her out I noticed a fair number of blisters that needed attention. After shopping the paint catalogs for weeks I decided upon Interlux VC Tar as a barrier coat to seal out water after repairing the blisters and Interlux VC Performance Epoxy as the topcoat. My next challenge was how to turn her over and support her while painting.
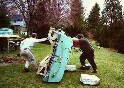
Two days a week I commute 1½ hours to my company's New Jersey office. This commute gives me plenty of time to think and I dreamed up a wooden frame that I could strap to the top of the boat before turning her that would support her while I repaired and painted the bottom. Building this frame turned out to be a project in itself. When completed I strapped it on and with a little help we got the hull upside down in the back yard.
[
2000 Picture Page #1 - Flipping the hull ]
As spring progressed I power sanded the old paint off and discovered hundreds of blisters and gouges on the bottom. I opened all of the blisters I could find, filled them with bondo and kept sanding. The trailing edge of the bottom where it meets the transom was in very bad shape. I completely rebuilt the edge with bondo and was able to regain the smooth rounded lines that I imagine she had when new. I also discovered some collision damage above the water line on the bow. The previous repair job was not done very well so I broke out all of the old filler and did it over. Many weeks, several cans of bondo, two large tubes of putty and a case of automotive spray primer later I had a slick primed surface I was proud of. All those days of Automotive Body Shop in High School finally paid off.
Interlux VC Tar is a product that is exactly what the name says! A thick black coal tar based two-part epoxy. I applied the first coat with a foam roller I purchased at a marine supply store. The volatile chemicals in the VC Tar proceeded to break down the adhesives in the roller cover. This caused roller after roller to disintegrate. I finally switched to the only other cover I had left, a cheap long nap cover. What a mistake! My super smooth primer was now covered with tacky black goo that was filled with fibers from my roller cover. I let the first coat dry hard and sanded the fibers down as best I could.
I continued the application of VC Tar with a short nap roller that did not shed. I was quite happy with the results by coat three when a freak thunderstorm blew up. Remember I am working outdoors in the spring. Every small leaf, tree flower, dandelion seed and piece of dirt for hundreds of yards around became airborne and most of it settled in the wet tar on my hull. After the storm went by I picked out what I could of the debris from the sticky tar but there was still a mess to deal with. Once again I let it dry sanded as smooth as possible without removing too much. Thus stuff isn't cheap.
Learning from this experience I built a wood frame to hold tarps that cover my work. My neighbors must now think I am completely nuts with two blue poly buildings in my back yard. Once covers my original project boat and the other is a paint booth. For several weeks I worked inside the makeshift booth battling rainstorms as the poly roof filled with water. I got quite creative at designing tarp support systems that would not collect rainwater. After what seemed like forever I finally had a minimum of 5 coats (10 mils) of black VC Tar in place over the entire hull. In some places the Tar is 7 coats thick due to sanding my mistakes. Three coats of white VC Performance Epoxy were applied with a roller over the Tar for a finish coat. Interlux claims that the VC Performance Epoxy must be applied by spraying. I'm sure that spraying would have resulted in a more level surface, however the cheap foam roller covers from Home Depot worked very well for me. They did not delaminate like the marine type did and left a relatively smooth finish.
I quickly learned that the labor of this paint job had only just begun. VC Performance Epoxy is a professional finish meant for racing boats. It dries to a semi gloss finish that looks quite good as-is. If you burnish by wet sanding and compounding you can achieve a super smooth, high gloss finish that rivals gelcoat. After a full day of wet sanding by hand I decided there must be a better way. I had more 5 grits to go through plus two grits of compound to achieve the finish I desired. I thought about power wet sanding and even read an article on the internet about some nut who used an electric orbital sander to wet sand on his boat, but I like living too much to try that myself. Further research discovered that professionals use special air driven wet sanders. The sander alone was out of my price range but I realized that all the pricey wet sander offered over a standard air sander was automatic water feed. So off I headed to Home Depot to purchase a compressor and an in-line orbital air sander (not a D/A which is round). This is about the time that my wife reminded my of an old saying; a boat is just a hole in the water you pour money into. The standard sander worked well in the wet environment. Being new to pneumatic tools I overdid the lubrication and had bit of trouble keeping paper on the sander when wet and oily. I used a wet sponge to feed water above the sander and to flush away dust. I did economize on the compressor by purchasing one that didn't deliver as much air as the sander consumed. Fortunately this only caused me to have to break every five minutes to let the compressor catch up. I needed that break anyway! The compressor I bought was about $200, the proper one for the tool was over $1000. For $800 I can wait.
The air sander saved my back and my sanity. In just a few days I got through all 5 grits of wet paper and completed two grits of polishing compound. I used a 10 automotive orbital buffer to apply the compound. I ended up had a bright white high gloss finish that I was sure would add at least 5 Mph to the top end.
It was finally time to flip her back upright and put the hardware and rubrail back on. I polished the aluminum rear corner hardware on my buffing wheel with white compound until it looked like new and bought a transom pad to place under the motor. With the Bonanza back on the trailer after more than two months of paint work I reattached the motor and the windshield. The wet sanding of bondo, primer and final color left quite a mess on the previously gleaming gelcoat. I used West Marine Cleaner Wax from on the gelcoat and followed up with a coat of West Marine Teflon Wax on both top and bottom. This restored the topside gelcoat to a showroom shine and with the newly painted bottom the boat looks like new (if you ignore the stress cracks). The finishing touch was to add a Keel Guard to protect the nose and keel when beaching and trailering. I also upgraded the trailer rollers to the non marring poly type to protect the new finish. By the time summer arrived I was listed on the best customer list at my local West Marine store.
It was finally time to put her back in the water and christen her with the name that has yet to be painted on the transom; Getting Wet (since 1961). A measure of how successful the bottom repair and application of the VC Tar barrier coat was is how little water collects in the bilge. The previous season an inch or more would collect in a weekend just sitting at the dock. This season the bilge remains dry unless we take on water from wave splash or rain. All season long I have drained less than a quart from the bilge with the pump.
We continue to enjoy our Corl Bonanza now on her third season with us. She will pull my 9-year-old son on a ski tube or a bob and makes 25 Mph. on smooth water with only the driver on board. Although too small for a family boat I will never sell her, the boat is just too cool. The biggest problem I have with her is operation on Candlewood Lake where I live. This lake is home to million dollar homes (not mine) and many pleasure boats that are designed for ocean water. On a typical summer weekend the swells from boat wakes can reach 4 feet or more. This boat was not designed for that kind of water. Waves splash over the bow soaking the occupants and occasionally forcing the rubrail from its mounting. As a result we tend to take her out mid week or very early in the morning and after dark on weekends when the water is calm. Once the season winds down in late September we can get out more during the day on weekends.
Coming Soon...
Completed Project
Pictures
Click here to go ![]() to Page 1 of the Narrative or Click Here for
to Page 1 of the Narrative or Click Here for ![]()